
Coming in hot! Hong Kong-style bakery buns!
Here in London, I live quite far from any Chinese/HK bakery. To my knowledge, I’d need to make the walk to China Town to get anything; it’s a very nice walk, but by the time I got back home the bread would be all cold.
My brother recently linked me the video of Lisa’s Kitchen after he successfully made these buns (and HK-style pineapple buns!). This is the same video I followed to make my little heart-shaped nibbles.
These buns are probably most appropriate for February around, you guessed it, Valentine’s Day. But hearts needn’t be reserved for just this one day! Pah! Self-love is v important too; I reckon more important.
I am very happy with how my buns turned out. They’re fragrant but soft and delicious. My oven is quite small and my tray is even smaller, so my buns began encroaching on each other during baking, but everything turned out okay!
This is how they looked after the final proof (prior to eggwash):

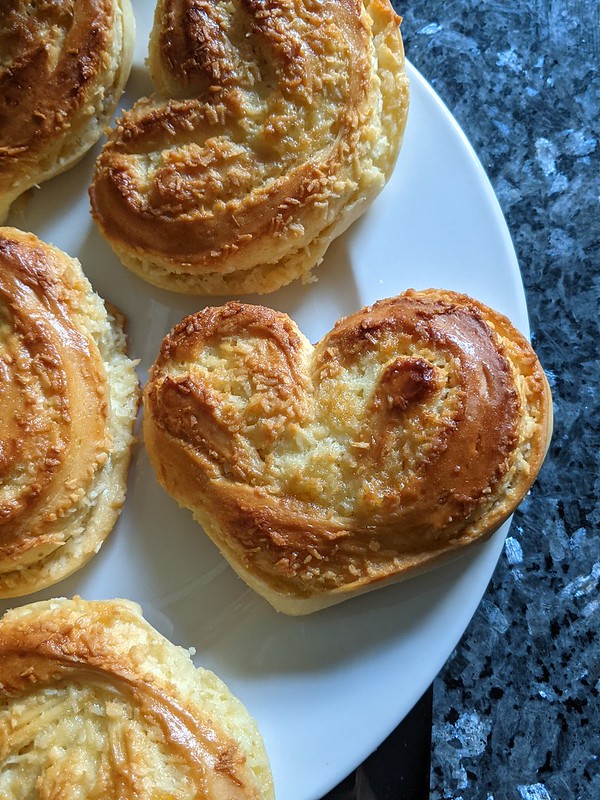
and this is how they turned out!

Notes I have after making these buns:
- Highly recommend watching the video!
- If you’ve got a stand mixer with a knead hook, use it. I currently don’t have a stand mixer so I did all the kneading by hand. There’s two 10-minute kneads, so if you want a good arm workout, this is it! By the end of it, my arms were burning and also felt like jelly.
- To help my yeast activate, I like to make sure that everything else I add with it is at room temperature; that includes my water and my egg. A quick way to get a cold egg to room temperature is by submerging it in warm water for 5-10 minutes.
- Condensed milk is what really gives these buns that special taste, so ideally, don’t substitute for another ingredients. Also make you’re using condensed milk and NOT evaporated milk – not the same thing!
- I didn’t have bread flour on hand, so I used all-purpose flour. Bread flour has a higher protein % compared with APF, which means more gluten is produced. I would not substitute bread flour with self-raising flour for this recipe – this flour has an even lower protein % than APF and contains baking soda, which is not called for in this recipe. Additionally, self-raising flour is not meant for yeast-breads, which this recipe is.
- I don’t think Lisa mentions how long the first proof is meant to be, I let my dough rise for about 1.5 hours to get it to double size.
=====================
Heart-shaped Coconut Buns
Recipe by: Lisa’s Kitchen
Ingredients:
Bun
- 260g Baker’s Flour/All Purpose Flour
- 20g milk powder
- 30g caster sugar
- 4g instant yeast
- 3g salt
- 1 egg, lightly whisked
- 25g condensed milk
- ~ 85ml warm water
- 25g room temperature unsalted butter
Coconut Filling
- 65g desiccated coconut
- 25g room temperature unsalted butter
- 1 egg
- 30g caster sugar
- 10g milk power
Method:
- To make the dough, add all the dry ingredients into a large mixing bowl. Add in the condensed milk, milk and water. Reserve a bit of water, depending on how absorbent the flour is.
- Mix the ingredients on low speed. Add a bit more water if the dough looks dry/clumpy and mix for 2 minutes until no flour is visible. Increase the mixing speed to medium and knead for 10 minutes. Make sure to scrape down the sides of the bowl every 1-2 minutes because sweet doughs tend to be quite sticky.
- The dough is done when it is no longer sticky to the touch. Add in the softened butter and knead for a further 10 minutes, until the butter is well incorporated and the dough is smooth, soft and elastic (gently press the dough and it should bounce back).
- Roll the dough into a smooth round ball before placing it in a non-stick bowl for proofing.
- Cover the dough with plastic wrap and place the dough in a warm 25-30°C/80-85°F) area (i.e. warm oven) and let it rest for approximately 1.5 hours or until doubled in size.
- Meanwhile, prepare the coconut filling. Whisk the egg and reserve a bit for eggwash, about a tablespoon. Add all the coconut filling ingredients together, adding in the softened butter last. Combine well to form a paste and let chill in the fridge for about 30 minutes.
- After chilling, roll the coconut filling into 9 balls of approximately 20 grams each. The balls should not be crumbly or fall apart. Place in the fridge to chill until needed.
- Once the dough has doubled in size, cut the dough into 9 equal portions, about 50 grams each (no need to knead). Roll the balls into round balls, each with a round smooth surface, seam-side down. Cover with plastic wrap to rest for 15 minutes.
- Flatten each ball to work out any air bubbles. Wrap the dough around the coconut filling before rolling the ball flat into an oval shape, about the size of your hand. Fold the dough in half lengthwise, and then fold again, widthwise.
- Make a cut in the middle of the folded dough, but take care not to cut to the end. Fold the dough out to make a heart!
- On a parchment-lined baking tray, place the hearts evenly, with even gaps in between.
- Heat the oven to 35°C/95°F, place a bowl of hot water at the bottom and spray the oven with water to increase the humidity. If you don’t have a spray, madly flicking water into the oven with your fingers also works. The humid environment will help with the second proofing/ fermentation process. Let proof for 70 minutes.
- Preheat the oven to 170°C/340°F. Mix the reserved egg with a tablespoon of milk and brush onto the surface of the buns. Bake the buns in the lower third of the oven for 22-25 minutes.
- The buns should be golden brown once done. Place to cool immediately.
- This bun is best enjoyed warm, so eaten fresh or warmed via microwave is best. Enjoy!
Any questions, please leave a comment below or send me an email!

